한 번 해보니 좀 재밌어서 ino 파일 하나에다가 묶기에는 좀 길어질 것 같기도하고 뭐든 모듈화시켜서 분리해놓으면 재사용도 좋고.. 이래저래 생각해보니 파일을 나눠놓는 게 좋을 것 같아서 분리 작업을 진행했다.
root@WAS-1:/arduino# tree
.
├── arduino.ino
└── README.txt
원래는 위 구조와 같이 되어있었다. README.txt는 명령어 실행할 때 찾아보기 쉽게 적어놓은거라..
여튼 이렇게 되어 있었는데 이렇다보니 저 소스코드에 집약적으로 넣는다는 게 비효율적 같았다.
기존 ino 파일은 아래와 같다.
#include <WiFi.h>
#include <PubSubClient.h>
#include <ArduinoJson.h>
#include <NTPClient.h>

const char* ssid       = "";
const char* pwd        = "";
const char* mqttServer = "";

WiFiClient   esbClient;
PubSubClient client(esbClient);
WiFiUDP      ntpUDP;
NTPClient    timeClient(ntpUDP, "pool.ntp.org", 32400, 60000);

void setup() {
    Serial.begin(115200);

    WiFi.begin(ssid, pwd);

    while(WiFi.status() != WL_CONNECTED) {
        delay(500);
    }

    client.setServer(mqttServer, 1883);

    while(!client.connected()) {
        if(client.connect("ESP32Client")) {
            client.subscribe("/mqtt/mqtt_test");
        } else {
            delay(2000);
        }
    }

    timeClient.begin();
}

void loop() {
    timeClient.update();
    String formattedTime = timeClient.getFormattedTime();
    time_t rawTime       = timeClient.getEpochTime();
    String message       = "MQTT CONNECTION SUCCESS!";

    StaticJsonDocument<128> doc;

    doc["message"]   = message;
    doc["timestamp"] = formattedTime.c_str(); // HH:MM:SS
    doc["epoch"]     = rawTime;               // UNIX timestamp

    char buffer[128];
    serializeJson(doc, buffer);

    client.publish("/mqtt/mqtt_test", buffer);
    client.loop();

    delay(5000);
}
소스코드를 읽어보면 크게
① WIFI 연결하는 부분
② MQTT 연결하는 부분
③ ‘/mqtt/mqtt_test’ topic을 구독하고 발행하는 부분
세가지로 나뉘어져 있는데 추후에 다른 프로젝트를 진행할 때 더 길어진다면.. 좀 그럴 것 같았다.
그래서 구글과 ChatGPT한테 물어가면서 어떤 식으로 모듈화를 시켜야하는지 물어봤다.
일단 ino 파일은 아두이노 스케치 파일로 하나의 아두이노에 하나의 ino 파일을 가진다. Spring Boot 프로젝트로 치면 ProjectApplication.java와 같은 존재인 것 같다.
그리고 ino 파일에서는 여러 파일을 (Java로 치면) import 할 수 있는데 그 부분이 #include "파일명.h" 가 된다. #include <라이브러리명.h> 은 표준 라이브러리 혹은 외부 라이브러리를 땡겨오는 부분이다.
그리고 .cpp 라는 확장자를 가진 파일을 생성해야 하는데 (Java로 치면) Class, Interface를 구현하는 부분이라고 한다. 나는 그냥 구현 로직을 적는 부분이라 생각하고 있다. ‘.h’ 확장자를 가진 헤더 파일을 import하여 구현이 가능하다.
이번엔 WIFI랑 MQTT만 나눌거라 그렇게 되면 총 4개의 파일이 나올 것이다.
나눠서 작업해보자.
일단 빈 파일을 생성했다.
root@WAS-1:/arduino# tree
.
├── arduino.ino
├── include
│   ├── mqtt.h
│   └── wifi.h
└── src
    ├── mqtt.cpp
    └── wifi.cpp
1. wifi.h
// 헤더 중복 선언 방지
#ifndef WIFI_H
#define WIFI_H

extern const char* SSID;
extern const char* PWD;

void setupWifi();

#endif- extern 키워드
- 헤더 파일 ‘.h’에서 선언
- 헤더 파일에서 변수 선언 후 cpp에서 값 할당
- extern 키워드가 붙은 변수, 객체는 여러 파일에서 공유 가능
- (Java로 치면) static public 같은 느낌으로 이해 중
2. wifi.cpp
#include "../include/wifi.h"
#include <WiFi.h>

const char* SSID = "";
const char* PWD  = "";

void setupWifi() {
    WiFi.begin(SSID, PWD);

    Serial.println("WIFI CONNTEING..");

    while(WiFi.status() != WL_CONNECTED) {
        delay(500);
    }

    Serial.println("WIFI CONNECTED SUCCESS!");
}
3. mqtt.h
#ifndef MQTT_H
#define MQTT_H
#include <WiFi.h>
#include <PubSubClient.h>

extern const char* MQTT_SERVER;

void setupMqtt();
void reconnect();

extern PubSubClient client;

#endif
4. mqtt.cpp
#include "../include/mqtt.h"
#include <WiFi.h>

WiFiClient espClient;
PubSubClient client(espClient);

const char* MQTT_SERVER = "";

void setupMqtt() {
    client.setServer(MQTT_SERVER, 1883);
}

void reconnect() {
    while(!client.connected()) {
        if(client.connect("ESP32Client")) {
            Serial.println("MQTT CONNECTED SUCCESS!");
        } else {
            Serial.println("MQTT CONNECTING FAIL..");
            delay(5000);
        }
    }
}
5. arduino.ino
#include <WiFi.h>
#include <PubSubClient.h>
#include <ArduinoJson.h>
#include <NTPClient.h>
#include "include/wifi.h"
#include "include/mqtt.h"

WiFiUDP      ntpUDP;
NTPClient    timeClient(ntpUDP, "pool.ntp.org", 32400, 60000);

void setup() {
    Serial.begin(115200);

    setupWifi();
    setupMqtt();

    client.setServer(MQTT_SERVER, 1883);

    while(!client.connected()) {
        if(client.connect("ESP32Client")) {
            client.subscribe("/mqtt/mqtt_test");
        } else {
            delay(2000);
        }
    }

    timeClient.begin();
}

void loop() {
    timeClient.update();
    String formattedTime = timeClient.getFormattedTime();
    time_t rawTime       = timeClient.getEpochTime();
    String message       = "MQTT CONNECTION SUCCESS!";

    StaticJsonDocument<128> doc;

    doc["message"]   = message;
    doc["timestamp"] = formattedTime.c_str(); // HH:MM:SS
    doc["epoch"]     = rawTime;               // UNIX timestamp

    char buffer[128];
    serializeJson(doc, buffer);

    client.publish("/mqtt/mqtt_test", buffer);
    client.loop();

    delay(5000);
}
‘client’ 변수는 ‘mqtt.h’에서 PubSubClinet를 객체를 담고있는 변수로 extern 키워드를 사용했으니 mqtt.cpp에서 값을 담은 후 ino 파일에서 공유가 가능한 것이다.
‘#include’에서 헤더 파일 경로 적을 때는 알아서 잘 적자.
- ‘.h’
- 헤더 파일
- (Java로 치면) import문, interface를 모아놓은 파일이라 이해 중
- ‘.cpp’
- 헤더 파일의 구현부
- (Java로 치면) Class, Method 등 구현 로직이 있는 파일이라 이해 중
6. 컴파일 및 업로드
# 컴파일
$ arduino-cli compile --fqbn esp32:esp32:esp32 arduino.ino

# 업로드
$ arduino-cli upload --fqbn esp32:esp32:esp32 --port /dev/ttyUSB0 arduino.ino
심오한 C++의 세계..
방통대 1학년 때 전공으로 들었는데 열심히 좀 들을 껄..
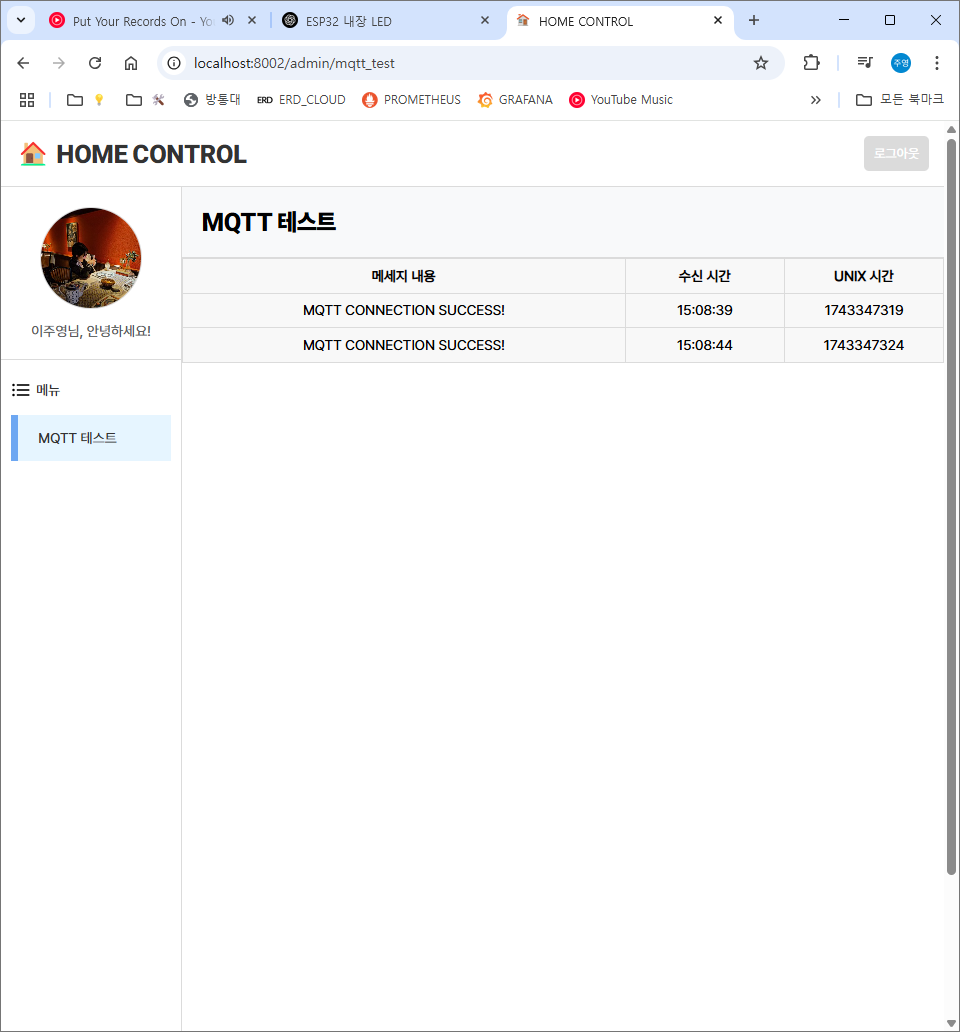
모듈 분리 후 정상적으로 작동되는 것을 확인할 수 있다.